Main TMPGEnc Screen Explained

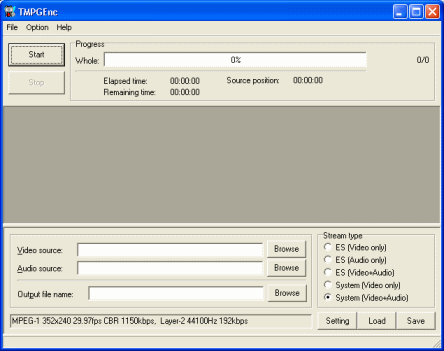
This is what you see when you launch TMPGEnc and close the Project Wizard. It has Drop Down Menu's, File, Option and Help, which I will completely explain in a moment, Start and Stop encoding buttons and an encoding progress bar at the top of the program.
In the Centre is where you will see a preview of any video that is encoding. At the end of the program you can load in a Video and Audio source and set an output filename that you want to be used for the encoded video. Also there is the option of Stream Types, you can choose Elementary Streams, Video Only, Audio Only, or Elementary Audio and Video Streams. You can also Output System Video Only Streams or System multiplexed Video and Audio streams.
The Setting button will bring you to the MPEG Output settings. The Load button allows you to load a template and the Save button allows you to save one. Beside these buttons you will see the specs of the Video and/or Audio you are going to Output. Firstly though, It is important to cover the options and Menu's so I will explain the File menu first.
The File Menu Explained

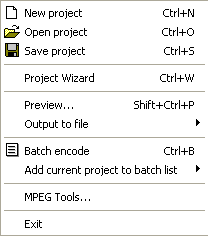
Almost every program for the Windows Operating System has a file menu and the File menu usually have similar options. TMPGEnc is no different, it has all the usual suspects like New Open and Save. If you click New Project while already working on some files already, you will be asked if you want to Reset the current project. If you open a Project file then all existing Project settings will be replaced by the saved Project settings. You can also Save a Project at any time.
The Project wizard option will load the programs project wizard which makes encoding to standards like VCD, SVCD or DVD very simple. I will cover the Project wizard very soon. The Preview options is quite useful, basically if you have changed MPEG settings you can preview what the video stream might look like, but since it's a preview, the quality might differ from the finished product. Output to File will be covered more extensively later as this is what allows you to encode to AVI files or save Uncompressed Wave Audio.
Batch Encode will be covered completely later in this guide. Batch encoding for those who don't know, means that you make a list of encodes to be done and it will encode each of them in the the order they appear in the Batch encoding list. Add current Project to the batch list allows you to add all of the MPEG settings to the Batch encoding list, these settings can be changed later on. MPEG Tools are a nice set of tools you can use on MPEG files that I will cover Later. Exit, exits the program. The next menu is the Option Menu.
The Option Menu Explained

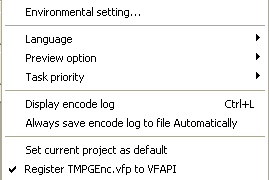
The Option Menu is looked upon as an Advanced Menu, not for Newbie's, but that is untrue, there are some options here that should be addressed by all users. Environmental Setting which will be completely covered later have options including Audio Encoders, CPU, VFAPI Plug-ins and other General Options. Since there are about five main sections in the Environmental Setting I have given it it's own section of the guides. Language allows you to change the Language of your TMPGEnc. It will be set to automatic under Windows 2000/XP but not under 98/ME.
The Preview options have some settings you might want to change. They are divided into three different sections. The first section has three options, Do not display, Display with thinning and Show all frames. Do not display, will completely disable previews and will save encoding time. Display with thinning means it will only Display I frames and cut out the B and P frames, which uses less CPU than Displaying all frames. Show all frames will show the entire video stream in preview, which will slow down encoding as it needs more CPU power. The second set has three options, Do not fix preview size, Fix at 352x240 and Fix to optional size. Fix at 352x240 is fixed as default, to stop the preview from being too big. Fix to optional size allows you to resize the preview to whatever you wish. The last option is Automatically resize the preview window means that if the preview window is big it will resize TMPGEnc to display it. You don't need this selected if you disable previews.
The Task priority is next. It is divided into two different sections I call Active and Inactive. The Active set includes When Active - High Priority, When Active - Normal Priority and When Active - Idle Time Only. These options are for when TMPGEnc is encoding, if you set it to High Priority, it will take less time encoding because it takes more CPU power but it will seriously slow down other processes running on your computer. Normal Priority will take a normal amount of time encoding, and leave some CPU for other Applications. Idle Time Only means the the encoding will get little CPU priority and will slow it down dramatically. The inactive set, When not active - High Priority, When not Active - Normal Priority and When not Active - Idle Time Only. These are the same as the Active settings only this marks the priority TMPGEnc will have when not encoding. This should be left at Idle time only.
Display encode log will show the encode log file. Always save encode log to file Automatically does exactly what it says. The set current project as default option means that the settings you are currently using will be saved to be loaded any time a New Project is created. Register TMPGEnc.vfp to VFAPI should always be ticked. Next menu is the Help Menu.
The Help Menu Explained
There is no need for a Screenshot here. You have three buttons, Contents that will load a help file for TMPGEnc, TMPGEnc official site which will launch an Internet browser and load the TMPGEnc website and About which will show you version information on TMPGEnc.
