Output Window

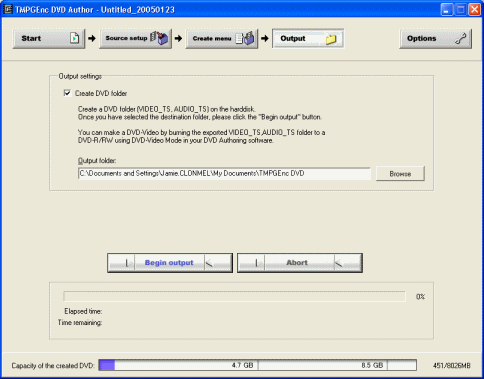
The Output window is the easiest of all the Windows. Tick the create DVD folder box and choose an output folder for the DVD to be saved to. When you have chosen your folder click the Begin Output button. Now we will cover the DVD writing tool.
The DVD Writing Tool

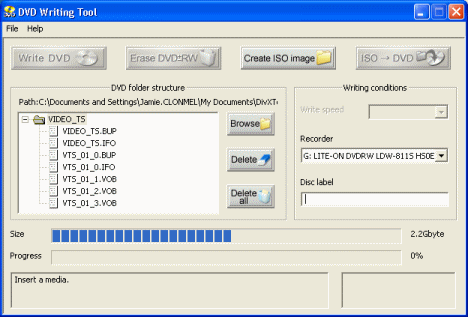
TMPGEnc DVD Author has its own DVD writing tool that is quite useful. There are four main buttons at the top Write DVD, Erase DVD RW, Create ISO image, ISO --> DVD. Below that is the folder structure and beside that are the writing conditions.
In the DVD folder structure there are three buttons, Browse, Delete, and Delete All. First of all you will need to click the Browse button to locate your VIDEO_TS folder, or whatever folder contains your DVD files. Be careful if you are deleting any files. The Writing conditions allows you to choose your Write speed depending on your blank media and your DVD burner. You can choose different recorders also and give your DVD whatever disc label you wish.
Now that you have a folder loaded into writing tool, you can either click the Write DVD button to burn to your DVD disc now or choose the Create ISO Image button to create an ISO image from the DVD folder. The ISO --> DVD button can be used to burn any DVD ISO image that you have on your HDD to DVD. You do not have to use TMPGEnc DVD Author to burn to DVD, you can use your favorite software like Nero Burning Rom also.
Finally
This guide should have taught you enough to create some pretty impressive DVD projects with TMPGEnc DVD Author. If you have any problems or need any help please visit our Discussion Forums and ask your questions there.
Version History
v1.0 -- 23rd January, 2005, First version online (Dela
