
Boost Windows performance with Smart Defrag
While it is true that regular defragmenting is much more vital if using FAT32, that does not mean defragmenting is unnecessary with NTFS. On the contrary, defragmenting can greatly improve performance. Each case is different of course, but some benefits of defragmenting (even with NTFS and Windows 7) can be a faster boot, faster application start-up times and generally better read/write performance. Additionally, if you have hard drives that are just packed with data constantly, having the file system as contiguous as possible can greatly reduce the strain on the mechanical parts of a traditional HDD, possibly boosting its lifespan.
In this quick article, I will demonstrate how using Smart Defrag from IOBit (FREE!) can help with performance and HDD health, and how to use the program to go beyond just defragmenting the file system to carry out tasks such as optimal file placement on the drive for best results, or defragmenting protected system files, $MFT records, the system pagefile and other things to optimize your system.
What is Smart Defrag, and where do I get it?
Smart Defrag is a free utility from IOBit that is available to download online.
- Smart Defrag for Windows: Download SmartDefrag for Windows from AfterDawn
Once you download Smart Defrag, install the application on your computer. Note that the installer package may include optional toolbars or other optional utilities that you might not want to install, so instead of just clicking next rampantly until the installation is finished, take your time and make sure you know what you are agreeing to install.
Once installed, Smart Defrag should run automatically and let you choose a skin. This is entirely up to you. Generally, unless you forcefully exit the program, Smart Defrag will run in the background all the time even if you close the interface. You can close it fully by right-clicking its icon in the system tray (bottom right corner of the screen on the taskbar.)
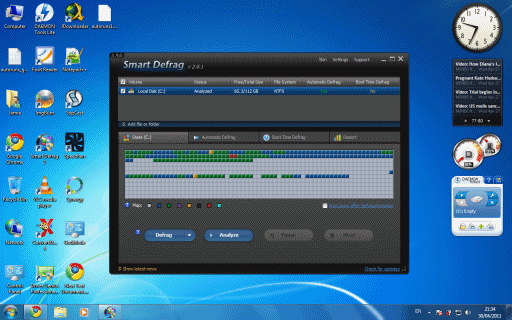
Smart Defrag - First Run
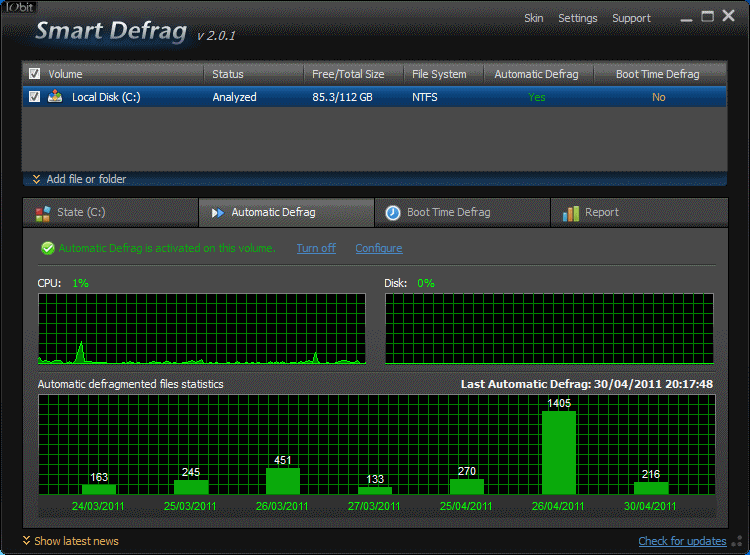
The Smart Defrag interface is quite easy to understand when examined for just a moment. The first thing you will notice is a list of the drives (partitions/volumes) that are available in Windows. In the example picture, there is just the C:\ system partition (run on laptop). This part of the interface also shows the disk usage (Free vs. Used Space), the File System (NTFS or FAT32), and the status of Automatic Defrag and Boot-Time Defrag options.
By default, Automatic Defragmenting is active upon installing Smart Defrag. What this means is that when your system usage falls below a certain level for a certain period of time, Smart Defrag will kick in and start defragmenting files. Another interesting thing to note is a small option to "Add File of Folder". Now, why would you want to do that?
Let's say you have a folder that you keep an enormous amount of work related videos and documents in, and you want that folder to get specific attention to make sure the files are fragmented as little as possible. If you choose to add that folder (even if it is present on a drive already listed), then that folder will become an option for defragmenting on its own. This can save you time if you just want to do one massive folder (like the installed path of a very large video game) as opposed to an entire file system. Likewise, if you have a large database or other big file, you can add that by itself also and defragment just that one single file.
In this guide however, I ignored that as a step since the object is to improve the performance of a system.
Below that area of the interface is where you will get a visual representation of an analyzed file system (or a file system being defragmented at the time). This will be shown under the "State" tab, and depending on what drive you select, the state will look different (or there will be no data if you have never run an analysis or defragment operation). Other tabs exist here; Automatic Defrag, Boot-Time Defrag and Report. These options we will look at later.
For now, let's analyze a volume.
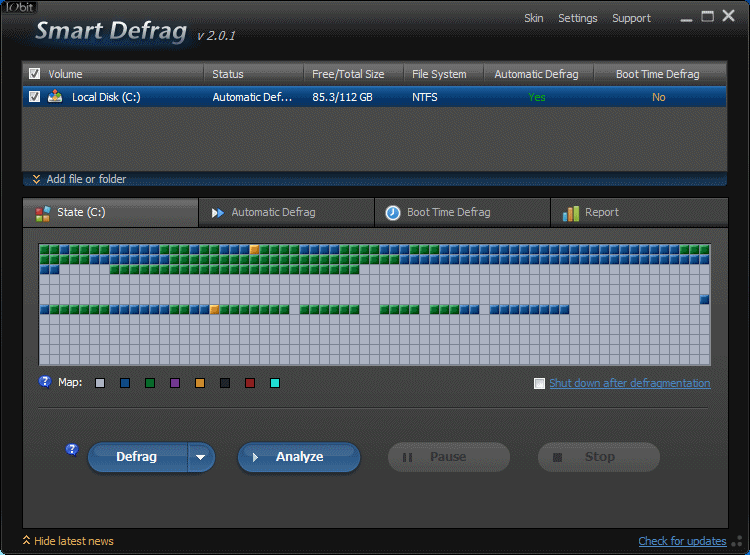
Smart Defrag - Analyze Volume
Before you just jump right into a defragmenting option, it's a good idea to get an idea of how the file system of any particular volume looks. In my example picture, I clicked the C:\ volume and then clicked the "Analyze" button on the main interface.
Smart Defrag then scours the drive to check every file it can access to see how fragmented each is (fragmentation is basically a single file broken up into several physical locations in a file system) and will give you a visual representation of what this looks like. It is color coded, but the color coding can be selected by a user (to see what each color means, just rest the pointer over the color).
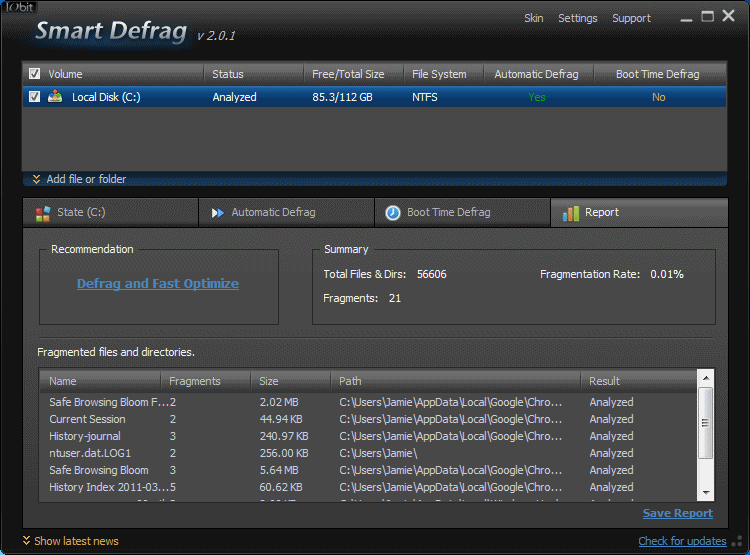
To get a more precise answer, click the Report tab once the analysis has been completed. In my example picture, you can see that my C: volume has a total of 56,606 files and directories, and of those there is only 21 examples of fragmentation. That's quite good, and the reason for that is Smart Defrag runs in the background on my example system. However, on a system where Smart Defrag has just been installed, this number will easily be in hundreds, probably in thousands and tens of thousands is very possible.
You will also see that there is a "Recommendation" on what I can do. There are really only three options that Smart Defrag can give here; Defrag Only, Defrag and Fast Optimize and Defrag and Fully Optimize. From experience, I can tell you that if you have a heavily / badly fragmented volume, the program will likely suggest Defrag Only, whereas if the fragmentation is low, it will suggest Defrag and Fast Optimize (as a side note, I have never seen it suggest Defrag and Fully Optimize).
The reason you might only want to defragment the system and not optimize at all, is basically how much time the process will take. Generally speaking, a Defrag Only operation does not take _that_ long on a relatively new system, whereas if you decide to opt for optimization, then Smart Defrag will also attempt to place files in "optimized" locations on the disk, based on many different reasons, with the goal to improve performance in one area or another.
Smart Defrag - Defragmenting a Volume
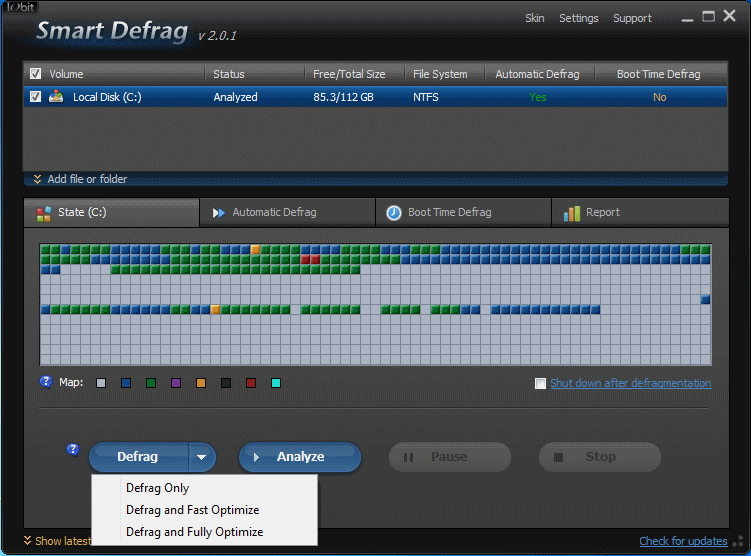
After running an analysis of a volume, you can carry out the recommended action of the program by just clicking it, but if you want to decide for yourself, then click the State tab. Now, click the Downward arrow beside Defrag and you will get the three options shown in the picture above...
- Defrag Only - This option will just defragment the volume to the best of its ability. This is the fastest option.
- Defrag and Fast Optimize - This option will defragment the volume to the best of its ability, and then also carry out file placement optimization in an attempt to improve performance. This is slower than Defrag Only, but comes with extra benefits.
- Defrag and Fully Optimize - This option will defragment the volume to the best of its ability, and will also carry out file placement optimization in an attempt to improve performance. The optimization is more advanced and aggressive than a fast optimization, but it will take noticeably longer to complete.
You can run any of these three defragment options any time you like, and also note that you have a checkbox option to "Shut down after defragmentation" if you want to start the process before you go to bed / work / school etc.
Note: If you are unable to select any option because the Defrag button is inactive, then it is likely that the volume is undergoing Automatic Defragmenting. You can stop it by simply clicking the Stop button and then select whatever option is best for you.
Note: If the defragmenting process starts and then inexplicably stops right after and the program does nothing else, then plug in your laptop/netbook because it will not run a system defrag on battery power.
Smart Defrag - Automatic Defrag
Smart Defrag has a feature built in to automatically defragment volumes when there is adequate unused system resources available to it. This can help to keep your volume as contiguous as possible and will hold off the need to run full volume operations. Note however that automatically defraging does not include any file placement optimization.
Some people however do not like having anything like this running in the background for whatever reason. Defragmenting will cause extra noise to come from your chassis / laptop while it is underway, for example. Other people just don't like to give resources to applications running in the background and prefer to carry out system maintenance at specific times.
Click the Automatic Defrag tab in Smart Defrag and you will see there is an option to turn it off on any selected volume. It also shows graphs of system resource usage as well as previous automatic defragmenting operations carried out.
Smart Defrag - Automatic Defrag Settings
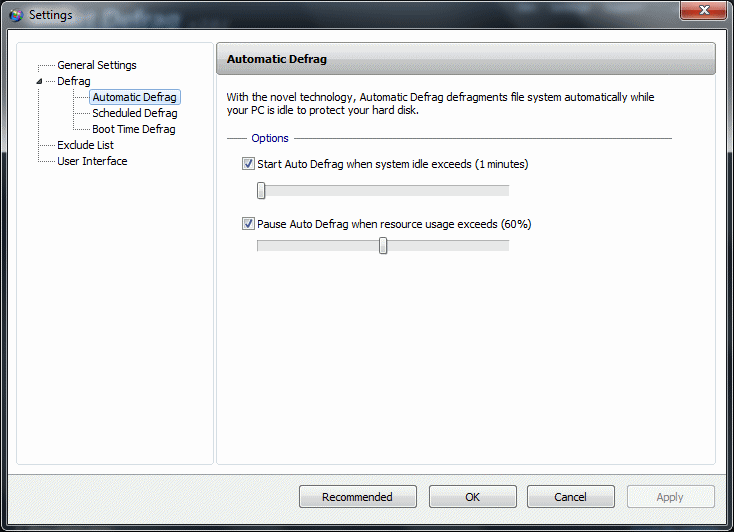
Click Configure under the Automatic Defrag tab to get options for the feature. There are two configurable settings for Automatic Defrag when it is active.
- Start Auto Defrag when system idle exceeds - Here you can set how many minutes (between 1 and 10) Smart Defrag will wait while the system is technically idle before starting to defragment volumes. You chance the value by dragging the slider.
- Pause Auto Defrag when resource usage exceeds - Here you can set what level of resource usage must be achieved before Auto Defrag pauses its operations (after it has already started while the system was idle). You can select between 20% and 100% by dragging the slider.
That really covers everything you can do with Automatic Defragmenting in Smart Defrag.
What if you don't want to have Automatic Defrag selected, but instead would like to schedule a time for a volume to be defragmented? This can be useful for computers that are on 24/7 and not always being used (such as during the night). Even though this option is not represented in the main interface of Smart Defrag, you can use the program's settings to enable it.
Smart Defrag - Scheduled Defrag Settings
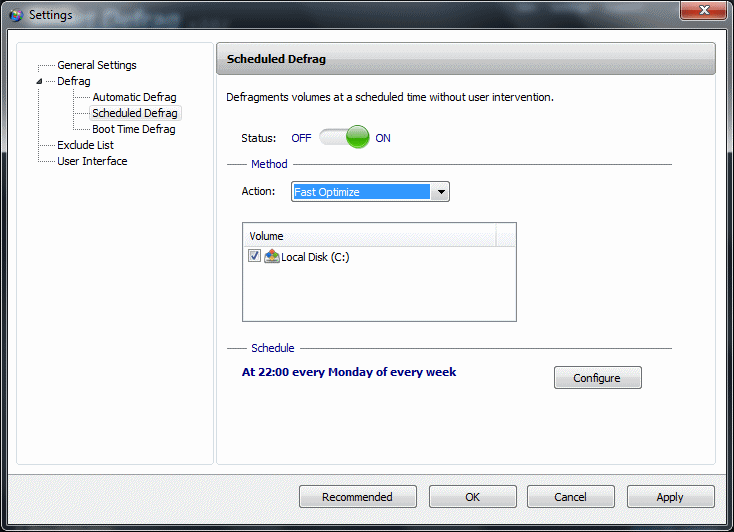
While Scheduled Defrag is not a feature that Smart Defrag flaunts on its main interface, it can be activated and configured in the program's settings. At the top-right corner of the Smart Defrag window, there is a Settings option, click it.
When the program's settings load, navigate to Defrag -> Scheduled Defrag. Now you will see something similar to the picture above this text. The first thing you will need to do is enable the Scheduled Defrag in the first place, as the default setting has the feature turned "Off". Simply click in the space beside the "On" option under Status. Now you will see some extra options become available.
Notice that unlike Automatic Defrag, you have optimization options if you use the program's scheduler. You can choose the Defrag Only option, or you can dictate a Fast or Full Optimization of the file system. Below this, you have to select (by checkbox) the volumes visible in Windows that you would like to carry out the task for (yes you can choose more than one.)
Now, as for when Smart Defrag should carry out the task, click the Configure button and a new little window will pop up. In this window you can set the time that you want the scheduled defrag operation to take place. There are also two other options that you should keep selected that will not start the tasks on battery power and also will pause a task if the system comes to rely on battery power all of a sudden.
So as you can see, a scheduled defrag is quite easy to setup. It is strange that it was relegated from the main interface of the application but it is still there and works fine.
Next we will look at how to get Smart Defrag to defragment important system files that you can't (should not be able to) move easily within the Windows environment.
Smart Defrag - Boot Time Defrag

What is a Boot Time Defrag? It is a defragmenting operation that runs early in the boot process of Windows. The reason such an operation is necessary is that certain files on a Windows system cannot be easily accessed and manipulated while the Windows environment is fully loaded. To do so could potentially be dangerous to the operating system.
This creates a problem. What if your registry hives (which are constantly accessed by the operating system and applications) are fragmented? What if your paging file is fragmented (swap file for system memory, that is usually a multi-gigabyte file that is also constantly accessed by the system)? Also, what if the $MFT metadata for an NTFS volume is also fragmented?
Depending on the degree of fragmentation, this can indeed be a performance killer, sometimes very severely. In my experience, dated Windows XP laptops with ~40GB hard drives that are constantly in use are examples of systems that can be badly affected by this type of fragmentation. It can hit any system however, particularly if the user writes a lot of data to the volume and moves a lot of data between volumes.
To get around this problem, Smart Defrag can run a defrag operation early in the Windows boot process before the paging file (pagefile.sys), registry hives or other system files are protected against file operations. This means you can defragment these important system files and resources and potentially fix performance issues with your system.
Click the Boot Time Defrag tab in Smart Defrag. It will be off by default, but you have a "Turn On" option. Now you can select what system resources should be targeted by a Boot Time Defrag, there are three options...
- Defragment pagefile, hibernation file - The page file (generally pagefile.sys) is the swap file used by system memory. It is vital to the optimal performance of a system. It is generally sized about 150% of the size of actual physical memory in your system and is one of the most accessed and utilized resources of the Windows operating system. This massive file can become fragmented for a variety of reasons, and defragmenting it is highly recommended. The hibernation file (hiberfile.sys) is a file located on a Windows operating system IF the system has hibernation enabled (pretty much every laptop/netbook). When the system hibernates, it dumps memory into this file, which is restored when the system is taken out of hibernation so a user can resume from the exact state of the system before hibernation. If this file is fragmented, then the process of hibernating and restoring can be hit. Defragmenting it is recommended.
- Defragment MFT - MFT stands for Master File Table. In the NTFS file system, all file metadata (name, creation and access dates etc.) are stored in the Master File Table. This $MFT information could also become fragmented for a variety of reasons and would be an obvious performance hit. Defragmenting MFT is recommended.
- Defragment System Files - There are vital system files that can become fragmented and hit performance. The most obvious examples are the registry hives. They are located in the %systemroot%\system32\config directory on a Windows system. These hives are access by applications and the operating system itself and are vital. If these are fragmented, then the hard drive needs to work harder to carry out these regular operations, and this is an obvious performance hit (as well as a threat to the health of HDD mechanical components). Defragmenting system files is recommended.
So now to choose when the Boot Time Defrag operation should be carried out, and how often, we click Configure.
Smart Defrag - Boot Time Defrag Settings

The settings for Boot Time Defrag allow you to choose when the process should be carried out, and how often. Under Method, you have four options...
- Only next boot - This means that a Boot Time Defrag will be carried out just once the next time the system boots. After it has been carried out, the feature will be disabled again. This is a once off unless you come back and enable it again manually.
- EVeryday first boot - This will aim to defragment the system files every day, but just once. The first time the system boots in a single day, the task will be carried out, but not again until the next day (not tomorrow, but the next time the system is booted again on a different day).
- Every boot - This option dictates that every single time the system boots up, a Boot Time Defrag is carried out, without exception
- Every 7 day first boot - This would aim to defragment the system files once per week, but specifically, it means that after a Boot Time Defrag is carried out, it won't be done again until at least 7 days have passed since the last Boot Time Defrag.
In my own personal experience, you don't need to do this all that regularly - not even once a week, probably not even once per month. Therefore, I'd recommend that you only schedule it for the next boot and then try to remember to do it again some time down the road.
Smart Defrag - Boot Time Defrag Example
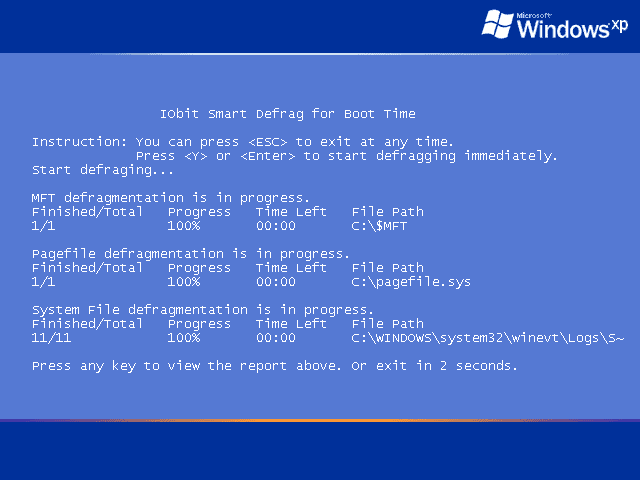
Above is an example of a Boot Time Defrag running during a Windows XP boot. In Windows Vista, or Windows 7, this will be much the same except the background will be black and the Windows XP logo will be gone.
The amount of time this process takes really depends on how badly the volume is fragmented. A badly fragmented pagefile.sys can take a long time to clear up due to its size, and then the need to find that amount of contiguous free space (or to at least get it down to as low a fragmentation level as possible) may also take some time to arrange.
This process will not actually edit the contents of all of the files, and therefore should be safe, but try not to kill power to the system while this is underway (you shouldn't worry too much, as the quickest defragmenting will be the registry hives, whereas if the pagefile.sys defragmenting goes wrong, the system should fix the problem on boot anyway).
Some thoughts and tips
We have come to the end of this quick guide, and I really hope that it leads to some good results for your system. There are a few tips I'd like to just give before I end the article that can help with results.
- Tip 1 - Clean File System First - Under even normal usage, a lot of temporary files and other unwanted stuff can build up on your file system. Having all of this extra contents on the disk reduces the amount of free space available and can therefore make it very hard, or even impossible, to find / create enough contiguous free space for the best results. For that reason, I recommended checking out this quick article on cleaning up junk off of your system quickly. Defragmenting a system that has just had hoards of temporary / useless files removed will give you much better results and save time.
- Tip 2 - Move non-essential files before defragmenting - Is your volume only a few gigabytes away from being full constantly? If that is the case, then defragmenting will take a long time and will likely only reduce the problem somewhat, as opposed to almost obliterating it for now. Are you one of those people who has folders jam packed full of videos and pictures, potentially hundreds of gigabytes in size? Well if so, these are non-essential files to the operation of the system. It is much better to have videos you captured and stored on your computer fragmented than it is to have the pagefile, for example, and that also applies to your applications vital files, your operating system's files etc. So I suggest if you can't seem to get your volume fragmentation down even close to 00.00%, then you should move away several gigabytes of these non-essential files to an external drive or some other solution before you defragment. You can move them back after you have defragmented the system.
- Tip 3 - Defragment normally before Boot Time Defrag - As mentioned earlier in the guide, the paging file on the system is generally about 150% the size of the total physical memory, or 100% of the size if you start to push up the total amount of memory (2GB physical memory under Windows 7 should produce a 2GB pagefile.sys). Now if your pagefile.sys is 2GB in size, and in let's say 50 fragments (not of equal size of course), then to defragment the file to just 1 fragment, the program will need to find 2GB of contiguous free space on the volume for the pagefile to be located. On a badly or even mildly fragmented system that is about 80% full, this might even be impossible (unless you have a very high capacity HDD). To increase the odds, run a Defrag and Full Optimize operation in Windows before attempting a Boot Time Defrag as this operation will result in the most contiguous free space as possible on the volume.
- Tip 4 - Don't use system volume for storage - This isn't even a tip on using Smart Defrag, but just an observation. Do not use your system volume (C:\ in most cases) to store things such as movies and music if you have another choice. Keeping these things on other partitions (laptop manufacturer generally split a HDD into two partitions that are usable in Windows) will reduce the amount of fragmentation on the system drive, and a defragment operation on the system volume then should also provide the best results in terms of performance.
Keep these tips in mind, and good luck.