| AutoMKV Installation and Configuration | You are viewing Page 4 of 5 -- Go to page 1 , 2 , 3 , 4 , 5 |
The Advanced Settings Tab
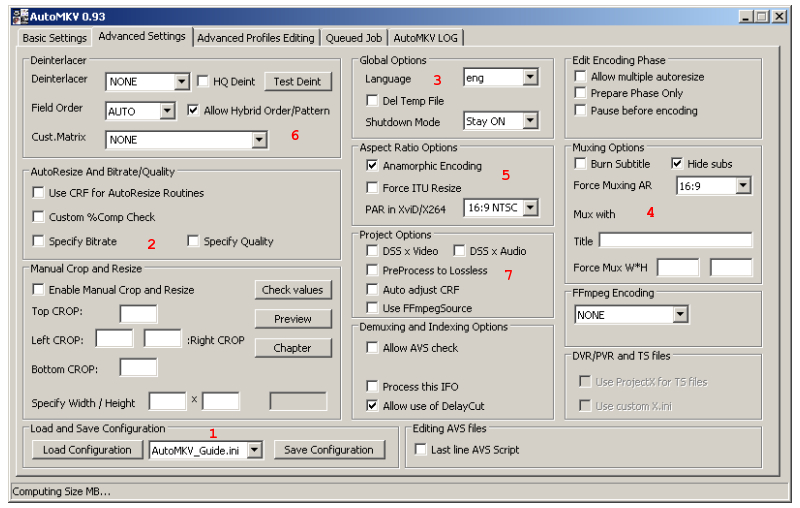
In addition to the automkv.ini configuration file that provides settings for the Basic Settings tab, you can also put together groups of editing and encoding options, including deinterlacing, bitrate and quality settings, and anamorphic (widescreen) encoding for widescreen aspect ratios. Unlike the defaults on the previous tab, you may have several sets of options saved, each one for a special purpose. For example, you might have one for widescreen DVDs, another for fullscreen, and still more for fullscreen and widescreen TV captures.

1. Saving and Loadig Configuration
Your selections on the Advanced Settings tab can be saved or loaded using the Save and Load Configuration buttons in the bottom left corner.
2. Bitrate and Quality Settings
Bitrate for ABR (Average Bitrate) encodes, Quantizer for CQ (Constant Quantizer) encoding, or Rate Factor for CRF (Constant Rate Factor) jobs can be specified.
3. Global Options
Select your language here, as well as whether you'd like temporary files to be deleted after encoding completes. Shutdown mode tells AutoMKV if it should shut down or reboot your computer after encoding completes. You can also set it to automatically log off from Windows.
4. Muxing Options
The mux settings apply only to MP4 and MKV (Matroska) output. Both the resolution and aspect ratio (AR) can be set manually. Otherwise they'll be generated automatically from the video itself.
Subtitles
Subtitles can either be stored as a separate stream or permanently added to the video. Select Burn Subtitle to make them a permanent part of the video. Hide subs creates a file where no subtitle stream is shown by default, much like a standard commercial DVD.5. Aspect Ratio Options
There are two ways to encode widescreen movies. Like the MPEG-2 video on widescreen DVDs, MPEG-4 video can be encoded anamorphically, meaning it will be horizontally stretched or vertically squeezed to reach the correct AR. If you're resizing and wish to ensure the ITU specifications for active picture area are strictly adhered to use Force ITU Resize.
The video's AR can be generated automatically or set manually. This is the value used to generate the AR for MP4 or MKV files when Force Muxing AR is set to Automatic.
6. Deinterlacing
Some people prefer to encode only progressive video. While there are advantages to deinterlacing, particularly in the lower bitrate required for comparable quality, but properly done it can increase encoding time significantly. The name of this section is somewhat misleading as there are options for both progressive and interlaced encoding.
Deinterlacer
If you're dealing with properly encoded theatrical movies they'll usually be encoded progressive, and then either sped up to PAL's 25fps or have pulldown flags to reach NTSC's 29.97fps. AutoMKV, through DGIndex, should recognize this and encode accordingly. Likewise interlaced video will be encoded interlaced7. AviSynth Options
AviSynth is used to provide video to the encoder of your choice. In most cases AviSynth doesn't use DirectShow to read video. If you have a DirectShow video or audio decoder installed that you want AviSynth to use you can check the DSS x video or DSS x Audio box. FFmpegSource is another method (plugin) AviSynth can use to read streams from MP4, MKV, OGM, or MOV files. Try this if DirectShowSource (the default method for opening them) doesn't work.
PreProcess to Lossless
One weakness of AviSynth is its requirement that video be processed multiple times when used as input for multipass encoding. For most scripts this isn't an issue, but more complex scripts, including some high quality deinterlacing routines, can slow down an encoder significantly. If you have plenty of free hard drive space, like an extra 40GB per hour of video you're encoding, you can PreProcess to a losslessly encoded format before encoding. This way AviSynth's processing only occurs once and isn't a factor in encoding speed.Continued On Page 5Next we'll look at AutoMKV's profile viewing and editing page. Although this tab can be ignored completely if you prefer a simple encoding solution, if you prefer to look under the hood and learn how profiles and the command line work you should continue on. Page 5 - Advanced Profiles Editing | |
| AutoMKV Installation and Configuration | You are viewing Page 4 of 5 -- Go to page 1 , 2 , 3 , 4 , 5 |
