Avi2DVD Encoders Settings
An encoder is required to convert the video of your input
MKV file into DVD-complaint
MPEG-2 video. Luckily, Avi2DVD pre-installs four separate freeware encoders,
QuEnc,
FreeEnc,
NuEnc and
HCEnc. For this guide, I recommend HCEnc. A fact to not is that Avi2DVD also supports
CCE SP, probably one of the best software MPEG-2 encoders on the planet, which is by far not freeware. However, if you do have it installed, you can select it for a much quicker process as well as superior video quality output.
Avi2DVD Encoders Settings - HCEnc

The HCEnc settings only allow you to choose a
Profile and
Matrix option. While I won't debate the pros and cons of the options available for Matrix (check out many digital video forums for this) options, I will insist that you choose
"Best" as your profile. Note that this will make sure that the encoding process takes much longer than the other options, but it is necessary to maintain high quality video.
Avi2DVD Subtitles Settings
Click the
Step 4 Subtitles tab. If you have
SRT subtitles along with your MKV file, here you can add them so they will be included in your
DVD-Video output. Add a subtitles file by clicking the
Subtitle 1 button. Once you add a file, you can change font and size settings to the right of the subtitles list.
Avi2DVD DVD Menu Settings
Avi2DVD has the ability to produce a working DVD menu for the output. While this guide does not cover this in detail, the
Capture Images and
MP3 -> MP2 tools are certainly work mentioning for their uses.
Avi2DVD DVD Menu Settings - Capture Images
The
DVD Menu that Avi2DVD can create will require a background on top of which, text and buttons are placed. Avi2DVD has added this tool to capture images directly from your input file. Simply click the
Capture Images button and this screen will load shortly.
Once loaded, the input video will start playing automatically. You can use the slidebar below to navigate through the video stream for a frame that would be useful as a background picture for a menu. Once you find one, simply click
Take Snapshot. If you are happy with the picture, click
Save Snapshot and the program will allow you to save it for later use as a
BMP image.
Avi2DVD DVD Menu Settings - MP3 -> MP2
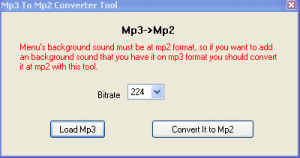
If you are interested in having background audio on your DVD menu, then click the
MP3 -> MP2 button. With this you can load any MP3 file you want and it will be saved as an MP2 file which can be used on a DVD menu. Simply click
Load MP3 and browse for the MP3 file you want, then Open it. One click of
Convert to MP2 and the program will convert it for you for later use.
Avi2DVD DVD Menu Settings - Create DVD Menu
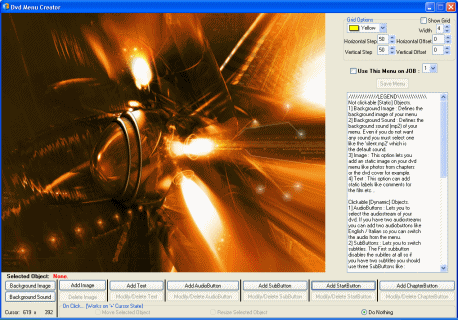
Avi2DVD has a full interface to create DVD menus. The
Capture Images and
MP3 -> MP2 tools shown earlier can help prepare some asset requirements for this process. Since this guide does not see a DVD Menu as a necessity, it does not cover this feature in detail, but it is fairly straightforward as there is a button for everything you could possibly add to the DVD Menu.
Please go to the Next Page
On the next page, we will start the conversion process and look at some information on burning the resulting DVD to a disc. This is the final page, so go on and finish this!
|
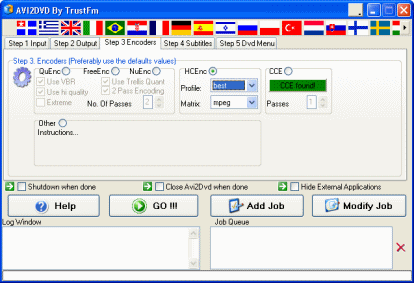
 An encoder is required to convert the video of your input MKV file into DVD-complaint MPEG-2 video. Luckily, Avi2DVD pre-installs four separate freeware encoders, QuEnc, FreeEnc, NuEnc and HCEnc. For this guide, I recommend HCEnc. A fact to not is that Avi2DVD also supports CCE SP, probably one of the best software MPEG-2 encoders on the planet, which is by far not freeware. However, if you do have it installed, you can select it for a much quicker process as well as superior video quality output.
 The HCEnc settings only allow you to choose a Profile and Matrix option. While I won't debate the pros and cons of the options available for Matrix (check out many digital video forums for this) options, I will insist that you choose "Best" as your profile. Note that this will make sure that the encoding process takes much longer than the other options, but it is necessary to maintain high quality video.
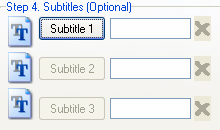
 Click the Step 4 Subtitles tab. If you have SRT subtitles along with your MKV file, here you can add them so they will be included in your DVD-Video output. Add a subtitles file by clicking the Subtitle 1 button. Once you add a file, you can change font and size settings to the right of the subtitles list.
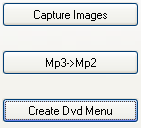
 Avi2DVD has the ability to produce a working DVD menu for the output. While this guide does not cover this in detail, the Capture Images and MP3 -> MP2 tools are certainly work mentioning for their uses.
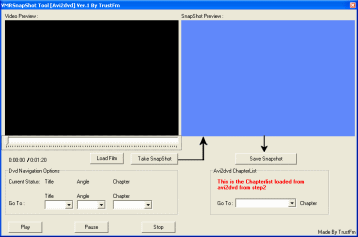
 The DVD Menu that Avi2DVD can create will require a background on top of which, text and buttons are placed. Avi2DVD has added this tool to capture images directly from your input file. Simply click the Capture Images button and this screen will load shortly.
 If you are interested in having background audio on your DVD menu, then click the MP3 -> MP2 button. With this you can load any MP3 file you want and it will be saved as an MP2 file which can be used on a DVD menu. Simply click Load MP3 and browse for the MP3 file you want, then Open it. One click of Convert to MP2 and the program will convert it for you for later use.
 Avi2DVD has a full interface to create DVD menus. The Capture Images and MP3 -> MP2 tools shown earlier can help prepare some asset requirements for this process. Since this guide does not see a DVD Menu as a necessity, it does not cover this feature in detail, but it is fairly straightforward as there is a button for everything you could possibly add to the DVD Menu.