Ad-Detective Parameters

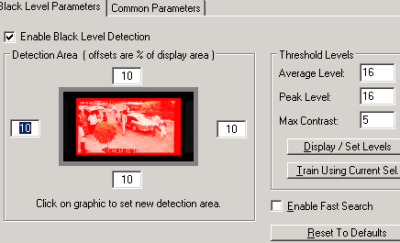
Set Ad-Detective Parameters from the Ad-Detective menu Opens the Ad-Detective Parameters dialog. Enable Black Level Detection tells Ad-Detective to check for black frames when finding scenes. Detection Area sets the offset from each edge of the video frame to watch. The edges of video frames often have noise, either from transfer or encoding, that can throw off detection. The values are all in percentages, so the same area of the video will be used no matter what resolution it's encoded at.
Threshold Levels
In finding black frames, there are three parameters that can be adjusted. They're found on the right side of the Black Level Parameters tab. Each one is a maximum value that a frame can have for that category and still be considered black. Average Level is the average intensity of all pixels after the frame has been converted to monochrome (aka average luma). Since most MPEGs are encoded with luma clamped to be no lower than 16, this will rarely be below that, and is commonly a little higher. Peak level indicates the maximum luma of any pixel in the frame. If you set this to a value lower than 16 you'll usually end up with no black frames being detected. Setting it to 255 (or even 235 for most MPEGs) allows all frames to be within the Peak Level's range. Max Contrast indicates the maximum difference, in percentage, between luma levels of any two pixels in a black frame.
Threshold Levels Tools

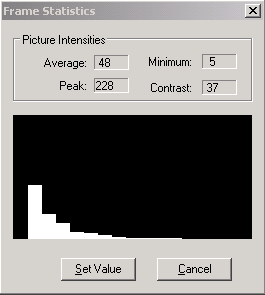
The Display / Set Levels button shows you the Threshold Levels settings that would qualify the current frame in the editor as black. It also shows you the minimum luma of any pixel in the frame. The Set Value will populate the Threshold Levels for each category to match the current frame. A better option is to make a selection of as many consecutive "black" frames as you can and click the Train Using Current Sel button to find the minimum Average and Peak Level that match every frame in your selection as black. You may still want to use a single frame to determine the Max Contrast to use. Make sure you clear your selection or select the entire program before running Ad-Detective.
Other Options
The Enable Fast Search checkbox tells Ad-Detective to only look at I and P frames (only a third of an MPEG stream) for black frames. If the transitions between commercials in your video have several black frames in a row it's probably safe to turn this on. It can make ad detection twice as fast. Reset To Defaults puts all Black Level settings back to their default values.
Common Parameters

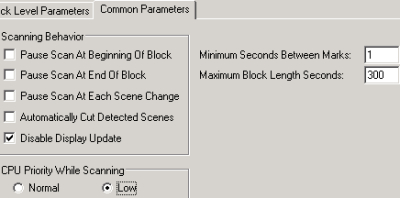
The second tab, Common Parameters, sets other options for Ad-Detective. There are options to pause at the beginning or end of a block (frames detected as a commercial block) as well as each scene change. Automatically Cut Detected Scenes tells VideoReDo Plus to use Ad-Detective's list of detected commercial blocks to cut them out. Minimum Seconds Between Marks indicates how many seconds must be between two detected scene changes for the first one to be kept. Maximum Block Length Seconds defines how long the longest commercial block can be. Disable Display Update stops VideoReDo Plus from displaying the frames Ad-Detective is evaluating. CPU Priority While Scanning allows you to set the CPU priority of Ad-Detective from the default value of normal to low. This is a good idea if you plan to use your computer for other things while it's running.
If you want to use Ad-Detective to find where commercials would have gone (with TV shows on DVD) you should set the parameters a little differently. While commercial detection requires very short sections to be included, I've found that increasing the Maximum Block Length In Seconds is very effective for getting Ad-Detective to mark scenes within a program.
Ad-Detective's Scene Markers
Assuming you're not letting VideoReDo Plus remove whatever it detects as commercials, and I don't recommend doing that without a lot of testing and tweaking parameters, you need to look at the spots Ad-Detective marks as commercial blocks. On the Ad-Detective menu are options to Go To Next Scene Mark and Go To Previous Scene Mark. The scene marks should be at least a good starting point to find commercial breaks, or in some cases simply scene changes. From the Ad-Detective menu they can also be cleared (all removed) or removed one at a time. When evaluating frames for scene changes it can also be helpful to look at the audio waveform that you can display with the thumbnails option. If it's low and flat that will tend to indicate that the black frames don't have any audio over them.
