| DVD to AVC with MeGUI Part 1 | You are viewing Page 2 of 4 -- Go to page 1 , 2 , 3 , 4 |
Creating Your D2V Project
DGIndex performs two important functions in the MeGUI encoding process. To begin with it provides a sort of map of the video in the form of a D2V file. This file will be used later by AviSynth to provide input for x264. DGIndex also demuxes audio from the DVD title, creating the source files for either encoding later for MKV or MP4 output or muxing directly into a MKV file.
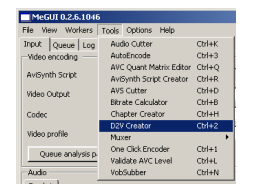
The D2V Creator
You'll find the D2V Creator on the Tools menu. After setting a few options and starting the resulting job you'll have a D2V (project) file and one or more audio files with names that reflect various properties including language, number of channels, and delay to sync them correctly with the video.
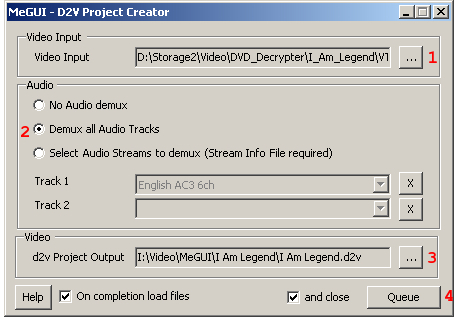 |
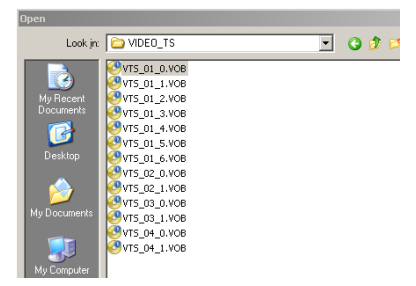
1. Open DVD Title Set
Start by opening the first VOB of the title set containing the movie. Typically this can be determined by looking for the title set with the largest number of files. In my case it's VTS_01, which goes up to VTS_01_6.VOB (6 VOB files) so I'll select VTS_01_1. You can ignore the files with names ending in 0 as these are used for the menus, and not titles. Make a note of the title set number as you'll need this for the both subtitle extraction and chapter export later on.
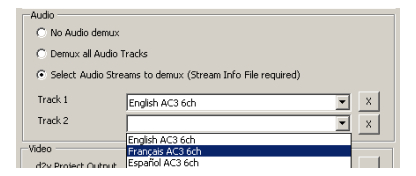
2. Select Audio to Demux
Unless you have a DVD Decrypter Stream Info File that MeGUI can use to identify the different streams you'll need to select Demux all Audio Tracks, which will give you a separate file for each audio stream present. If you do have the Stream Info File you can select specific streams based on descriptions taken from the IFO files.

3. Select Destination
By default the D2V Creator will save the D2V project and demuxed audio files in the same folder as the DVD files. I recommend using a separate folder for MeGUI's work. If for some reason you find yourself deleting MeGUI's work files you won't run the risk of accidentally getting rid of DVD files as well. Some people recommend saving output files to a different drive than the source, but since the majority of all processes are CPU-bound, meaning the CPU is the primary limiting factor in encoding speed, the hard drive will only make a difference if you're doing other things while encoding.

4. Queue the Job
In order to actually create the D2V and audio files you'll need to create a job and add it to the Queue. If you wish to create jobs for additional DVDs you can do that before quitting. If you prefer to have the D2V Creator close after creating the job check the appropriate box.
Start the Job
 Once you have the D2V Creator closed you'll need to go to the Queue tab and start your job. This is done with the Start button at the bottom of the MeGUI window. Notice that the Mode for this job is idx for Index. If you have a lot of jobs queued this can be a good way to figure out what they are.
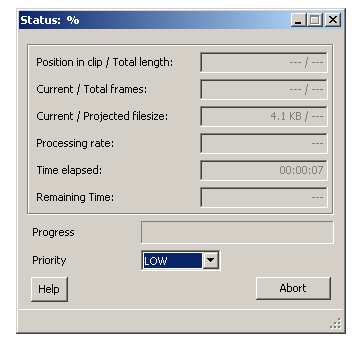
Status
The Status dialog will give you an indication of how much progress has been made and when it's likely to be complete. You may find it odd that Priority, which determines the priority Windows assigns to this program compared to others that are running, is set to LOW. If you're not doing anything on your computer while running MeGUI you can set this higher, but in most cases the difference in speed is negligible. On the other hand if kept at its default setting it's much easier to run other programs at the same time. Since encoding video can easily take many hours you may find that it's more useful to use your computer while encoding than finishing your video a few minutes sooner.
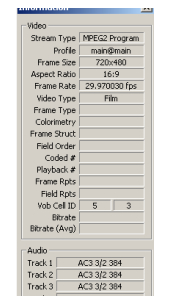
The DGIndex Window
In addition to the MeGUI Status dialog, you can see what DGIndex is doing in its own window. If you didn't already know them, you should take note of the Aspect Ratio and Video Type. These will be important in the next guide where resizing and deinterlacing are explained.
Continued On Page 3In the final section of Part 1 we'll create a text file with chapter information which MeGUI can use in the final step where an output file is created. Page 3 - Extracting Subtitles | |
| DVD to AVC with MeGUI Part 1 | You are viewing Page 2 of 4 -- Go to page 1 , 2 , 3 , 4 |
