DVD Author Pro Interface - Start Screen
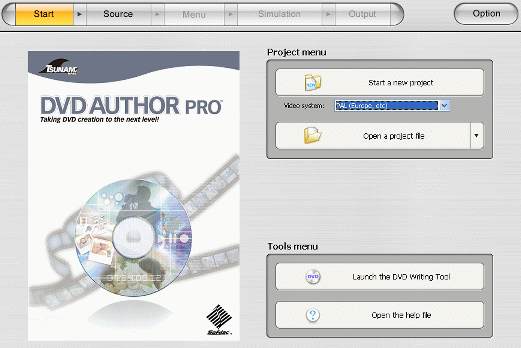
Ok the picture accompanying this text shows the first screen that you will see when you launch the software. I'll take a brief look at it now, although it should be pretty easy to understand anyway.
Under Project Menu, you have two options; Start a new project or Open a project file. Also under Open a project file, you have to select the Video system. Your choices are the usual NTSC and PAL. Choose depending on what is standard in your region (for example, Europe and Australia, choose PAL, and North America and Japan, choose NTSC).
The only time you shouldn't choose based on your region, is if you live in let's say a PAL region, but you have NTSC input files. Generally, PAL DVD players play back NTSC quite well (although sometimes black and white), but unfortunately for people in NTSC countries, the same usually doesn't apple with playing PAL movies on an NTSC DVD player.
Below the Project Menu, there is a Tools menu that include the DVD Writing Tool, which is an excellent little too for burning DVDs. Also you can view the help file quickly here. Before we Start a New Project, let's take a look at some preferences. Click Option --> Preferences.
DVD Author Pro Preferences --> Pref. 1
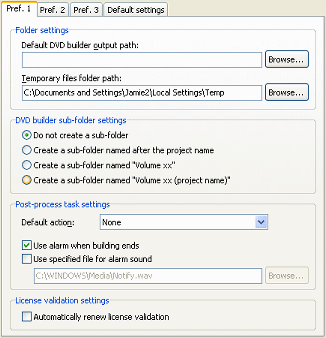
OK here are some general preferences for the program. First we have the Folder Settings. The Default DVD builder output path is a default folder you can select that will store all your output DVD files. Since this will be quite large, use a disk/partition with enough free space. Temporary files folder path is where the program will save temporary files during the process (will be deleted when finished). Once again, choose a disk/partition with enough free space.
Next are the DVD folder subfolder settings. These are quite easy to understand. Basically all you are choosing is whether you want another folder inside your output folder that contains your DVD files. This is set to Do not create a sub-folder by default and most people will keep it that way. However, you can choose any of the other three options also if you wish, some people have their own preferences for output folders on all programs they use.
Next is the Post-procss task settings. This lets you choose things that will be done when the process is completely finished. Default Action gives you 4 choices; None, Shutdown, Standby and Hibernate. This is completely up to the user, some people like to have their computer shutdown automatically after CPU intensive tasks. Next we have two options for playing sounds after the process is complete. Use alarm when building ends, will send an audio signal when the process is complete, and Use specified file for alarm sound lets you choose whatever audio you want played when the process completes.
License validation settings is next. If you have purchased the program, then expect that every few weeks you will need to renew your license via an Internet connection. Selecting Automatically renew license validation will have this task done automatically and you won't be prompted to validate anymore. Now click the Pref. 2 tab and we'll see if there's anything worth editing in there.
DVD Author Pro Preferences --> Pref. 2
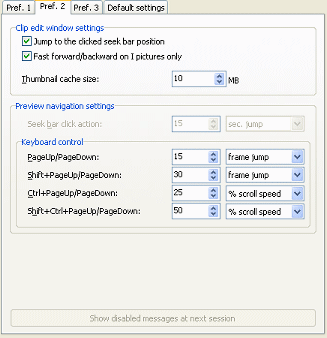
There isn't really much editing to be done here, but let's take a look anyway. The first options we have are for the cut-edit window, which we will see later on. Jump to the clicked seek bar position, when selected, the playhead moves to the clicked point of the seek bar instead of using the Seek bar click action. This is selected by default and is best kept that way. Fast forward/backward on I pictures only. This options should be kept selected as it reduces CPU load. Thumbnail cache size is set to 10MB at default, setting it higher may allow for faster navigation but will consume more memory.
The next options are again completely up to the user because it sets keyboard keys to be used while skipping through the preview (skipping a certain amount of frames). The default settings are usually fine but if you have your own preferences, feel free to edit. Now click the Pref. 3 tab for some CPU settings.
DVD Author Pro Preferences --> Pref. 3
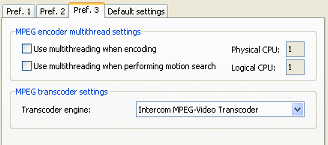
There are very few options to edit here and most of you won't make any changes at all. First of all we have MPEG encoder multithread settings. The two options below are Use multithreading when encoding and Use multithreading when performing motion search. You should only select any of these options if you have two logical CPUs.
MPEG transcoder settings is next. Here you can select the Transcoder engine used. What are available depends on your computer and if you don't know what you are doing, leave it at the default option instead of changing. Now we are ready to move onto the last tab, the Default settings tab.
DVD Author Pro Preferences --> Default Settings
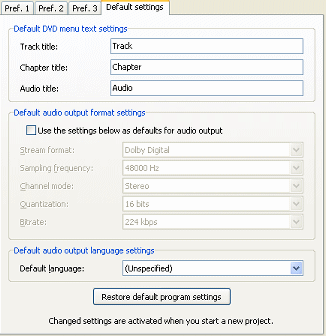
Here you can change some default output settings. It helps to select default options to make the process faster. The first option is Default DVD menu text settings. When you create a menu from template, there will be text on it by default, here you can change the default text if you wish (though you can change the text in he editor later). You change the text for Track title, Chapter title and Audio title.
The next settings allow you to select default audio output settings. DVD Author Pro automatically selects an output based on the input audio, but if you select Use the settings below as default for output audio, then any settings you put in will be used for all audio output. Your options for audio format are Dolby Digital AC3 audio, Linear PCM and MPEG-1 Audio Layer II (MP2). The rest of the settings such as the bitrate and sampling frequency (should be kept at 48000 Hz), channel mode (stereo usually for two channel audio) and quantization.
Default audio output language settings is next. This means that you can select a language that the program will set to all audio tracks by default. The languages available in the Default language list comply with the DVD-Video standard. Beneath all of this is also a button to restore default settings if something goes wrong later on. Ok, have all your editing done? Then click OK, and click the Start New Project button on the Start Screen. Go to the next page to see how to input files into the program.
