The Start Window Explained
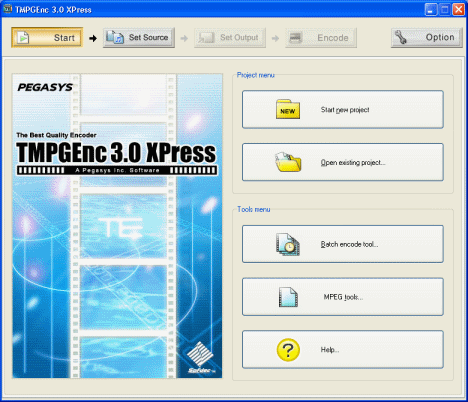
The first window that you will see when you run TMPGEnc XPress is the Start Window. It contains three different sets of buttons. At the top of the screen are what I like to call the Step buttons. The Start button is currently selected, indicating that you are now on the Start window. Set Source is not selected but it is clickable. If you clicked Set Source it would automatically begin a new project. Set Output and Encode are not clickable because you haven't set your Source files yet. Then there is also the Option button which we will go over in a minute after I explain the rest of the screen. The Project Menu contains two buttons, Start New Project and Open Existing Project. If you click Start New Project it will load the Set Source screen. If you start a new project while another one is already in progress you will get a message asking you if you wish to save the existing project before opening a completely new one. If you click Open Existing Project, the program will ask for a .txp3 file that you saved before. While opening an existing project, TMPGEnc XPress will try to locate the files that you used with this project. If it can't locate them it will ask you to find them. If the files have been deleted then you cannot continue the project. The Tools menu has three buttons. The Batch encode tool we will see later along with MPEG tools. The Help button will load the programs help file, which would contain information on any aspect of TMPGEnc XPress. But for now let's take a look at the Options. Click the Option button.
TMPGEnc XPress Options
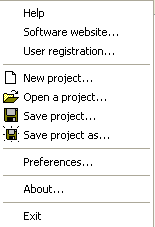
This is what you will see if you click the Option button. The Help button will open a help file that contains information on every aspect of TMPGEnc XPress so it's always a useful resource if you get lost. The Software website button will take you to the Pegasys Inc. homepage. User Registration will take you to the Registration part of the Pegasys Inc. website. New Project does exactly the same thing as the Start New Project button on the Start Window. Open a Project does the same thing as the Open an Existing Project button on the Start Window. Save Project allows you to save a project you are currently working on. If it's your first time saving the program will ask where you wish to save your .txp3 file, and any save after that will automatically update that file. Save project as, will always ask you where you wish to save a .txp3 file, it will never save automatically.Preferences, we will look at now in a moment. About gives you information on the Version of the program. Exit will close TMPGEnc XPress. So these options are simple enough. Now I will explain the Preferences. Be warned however, that there may be a lot of technical information here that you don't necessarily need so don't be put off the guide if you are having problems understanding some of this information. Click the Preferences button.
TMPGEnc XPress Preferences - Pref. 1
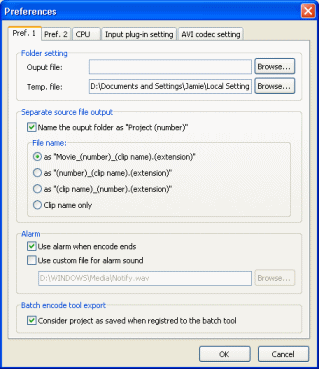
Pref. 1 is the first window you will see when you open the Preferences. The first thing you can change are some Folder settings. The Output File field allows you to select a folder as your default folder to save encoded MPEG files into. You can select the folder by clicking the browse button, locating it and clicking OK. The Temp. File field allows you to specify a folder where temporary files will be saved during the encoding process. Make sure that you select a folder that is on a HDD where there is a lot of free space if you plan on encoding large files. The next little section allows you to change the naming policy of project folders and encoded files. There is only one option for naming output folders and I think it's best that you leave it clicked. Name the output folder as "Project (number)". This option means that your output folder will be called whatever project number it was like Project3 or Project 4. The options for the filenames are entirely up to you. This won't make a difference the output files, only the filenames. I just leave the first option ticked. Next we have the little Alarm options. If you leave Use alarm when encode ends ticked, then when the encoding process is finished a little alarm noise will be outputted by your speakers. Use custom file for alarm sound will allow you to select an audio file of your choice to be played when the encoding process is finished. The last option on this window considers the batch tool. Consider project as saved when registered to the batch tool, if ticked means basically that when you register a project to the batch tool, it will be no longer considered unsaved by TMPGEnc XPress. This means that if you close the program without saving the Project, but you have registered it with the batch tool, the program will not ask you if you wish to save before closing. Next we will move onto the Pref. 2 tab, so click the Pref. 2 tab.
TMPGEnc XPress Preferences - Pref. 2
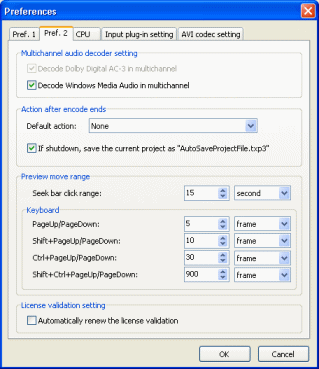
Pref. 2 is the next part of preferences we will cover. The first settings we can look at are the Multichannel audio decoder settings. Both Decode Dolby Digital AC-3 in multichannel and Decode Windows Media Audio in multichannel should be left selected. Below it we can set an action to be performed after the encoding finishes. TMPGEnc XPress can shutdown your computer after encoding or put it on standby or hibernation. Under it is an option to auto save a project after shutdown which should be saved in case anything goes wrong with the encoding and it will save you time when you try again. The preview window settings are below this. The settings should be absolutely fine the way they are as previewing isn't all that important to the encoding process at all. Automatically renew the license validation gives you the option to have the license automatically validated instead of having to manually confirm the license renewal later on. The next tab is the CPU tab so click that.
TMPGEnc XPress Preferences - CPU
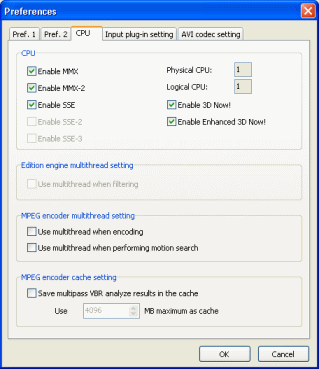
There's not much can/should be changed under the CPU preferences. These are technical options that may be hard to follow for newbie's, so you can skip this part if you wish. Under no circumstances should you untick Enable MMX, Enable MMX-2, Enable SSE or Enable SSE-2 (if available). Disabling any of these will greatly reduce the performance of the encoder. You also see an option for Enabling SSE-3, this however is only available for users with Pentium 4 HT processors. Physical CPU sets the number of CPU usage by TMPGEnc and Logical CPU sets the number of logical CPU used during the process. If you have the option of 3D Now! and Enhanced 3D Now!, you should select them. Users of AMD processors will have these two options. Next is the Edition engine multithread setting. Underneath this is just one option that will be unavailable for some users, Use multithread when filtering. This means that the filters in the program would be allowed use the multithread option of the Hyper Thread processor and may improve overall performance of the process. Next set of options are the MPEG encoder multithread settings. Here you have two more options, Use multithread when encoding and Use multithread when performing motion search. As you may have guessed if these options are ticked it means that the encoding process and the motion search process can use the multithread options of the hyper thread processor. The last part on this tab now is the MPEG encoder cache setting. The option you have is Save multipass VBR analyze results in the cache and you also have an option of how many MB's. When you select this option it means that you are setting the maximum amount of temporary MB's the program can use while performing a VBR 2-pass encoding. With a 2-pass encoding, the video stream will be analyzed first, and then the data from that will be used to encode it in the best way possible using a variable birate rate (VBR), so after the analyzing there will be some temporary data saved. Make sure that if you decide to select this option that you keep the number of MB's high to avoid any problems. Next we have the Input plug-in setting tab, so click it.
TMPGEnc XPress Preferences - Input Plug-in Setting
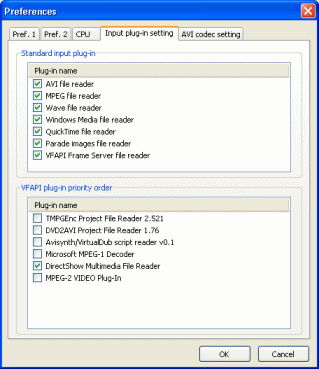
Here is just a list of plug-ins the program can use. The Standard Input Plug-in list is a list of standard TMPGEnc XPress plug-ins that you have the option of disabling if you wish. Under the VFAPI plug-in priority order you can actually just click on one of them and drag it to the top of the list. This is how you prioritize these plug-ins. A simple google search can bring up many VFAPI plug-in's that can be used with TMPGEnc XPress, all you have to do is place the plug-in in the same folder as TMPGEnc XPress. Well that's all that needs to be said here, click the AVI codec setting tab.
TMPGEnc XPress Preferences - AVI codec setting
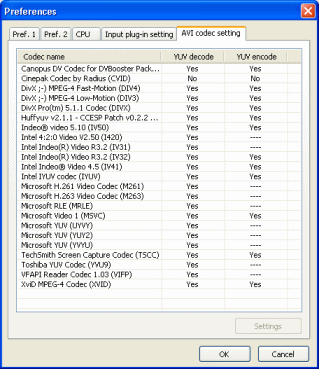
Here is just a list of the AVI codec's that you have installed on your computer. Each codec can be set to encode and decode in YUV format, which provides more efficient processing in MPEG and WMV formats. Any codec that is capable of decoding in YUV will have a Yes beneath it, and if the option is disabled it will have a No beneath it. Any that isn't capable of decoding in YUV format will have a ---- there instead of a Yes or No. To change these options, select a codec and click Settings. Well that's all the preferences covered so now we can go back and look through the next parts of the program.
