Starting a New Project
There are two new ways of Starting a New Project. The first way is going back to the Start window and actually clicking the Start New Project button. The other way is simply to click the Set Source button, although you wont really have a new project started until you add some files to clip list. Either way you will end up at the Set Source Window, so lets have a look at that window now.
The Set Source Window Explained
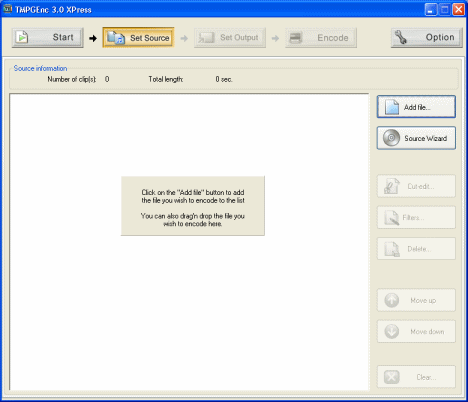
The Set Source Window is quite easy to explain. First thing noticeable is the clip list. At this stage it is blank because you have to add clips to the project which we will cover in a moment. Over the Clip list is the source information, that simply shows the number of clips that have been added and the overall time of all the clips. On the right is the button list. Add File simply allows you to Add a file to the clip list. Source Wizard does the same as Add file except it allows you to open DVD Video, and select from multiple audio stream which one you wish to be encoded. The Cut-Edit button allows you to cut pieces from the video and do some other editing. The Filters button brings you to a list of filters that you can use during the encoding process. The Delete button deletes a clip from the clip list. The Move up and Move down buttons allow you to Move a clip into a different position on the list and the Clear button will clear the entire list of clips. When you actually do add a file, the clip appears in the list and has two buttons on it, Edit and Delete. Now to start a process of encoding first you need to add whatever clips you need to the clip list, cut anything out and select any filters that you might need to run with the encoding process. We'll start by looking at the Add File options.
The Add File Window Explained
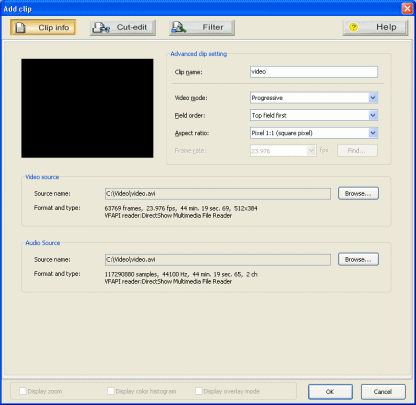
The Add file window contains mostly information. After clicking the Add file button you will get a new window. You can change the Clip Name to anything you want. You can choose between Progressive and Interlaced video (usually video is progressive). Field order should be left on Top field first.Your Aspect ratio is important for output quality. For AVI files you can use programs like AviCodec and GSpot to get some idea of the Aspect Ratio. If you are not sure, then basically, if the file is full screen, choose a 4:3 option and if it's widescreen choose a 16:9 option. In most cases the Frame rate will be guessed by TMPGEnc XPress already. You can also change the video source path and audio source path if you wish. You will also see some other information on the Video and Audio stream under the Source Name fields. The Video information shows the amount of frames in the stream, the framerate, the file length, the video resolution and information on what can be used to decode the stream. The Audio information shows the amount of samples in the audio stream, the sampling frequency, the audio file length, the number of audio channels and the information on what can decompress it. We will now take a quick look at the Cut-edit window in case you need to edit the stream in any way. Click the Cut-edit window.
The Cut-edit Window Explained
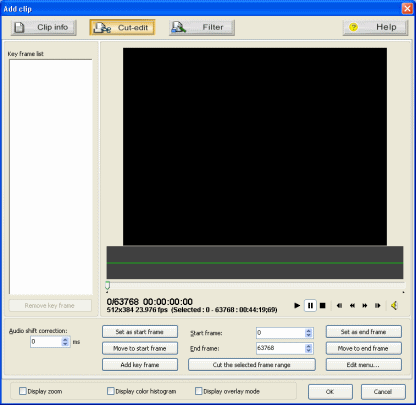
You will see this screen when you click the Cut-Edit button. Immediately the entire file will be selected, which will be 10's of thousands of frames usually. The buttons available are Set as start frame, Move to start frame, Add key frame, Cut the selected frame range, Set as end frame, Move to end frame and Edit Menu. Set as start frame allows you to set the frame you are currently on as your start frame for a frame selection. Move to start frame will bring you back to the very first selected frame in the movie file. Add key frame allows you to add a key frame into the video stream. Cut the selected range will allow you to completely cut out a section of the video that is selected. Set as end frame will allow you to set any frame as the end of your frame selection. Move to end frame will always bring you to the very last selected frame in a video clip. Edit menu just has a couple of extra options including canceling a selection. So this can be helpful if you need to cut out certain parts of clips that you do not wish to be in your encoded files. When you are done with any editing you need to do, click OK. You can also now go to the Filters window to select what filters you can use on your source video but first we will have a look at the Source Wizard so go back to the Set Source window and click Source Wizard.
TMPGEnc XPress - Source Wizard - 1
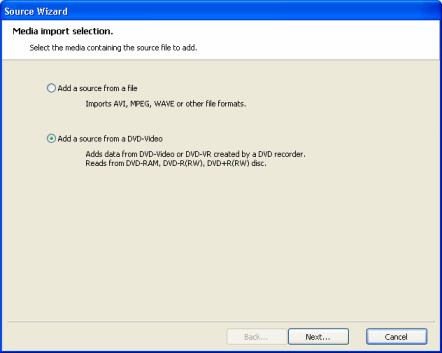
The first option you have with the source wizard is whether you want to open individual files like AVI or MPEG files or whether you would like to open a DVD Video instead. Since we have already learned how to open individual files, select the DVD Video option and click Next. The next thing you will need to do is select a VIDEO_TS folder or any folder that contains DVD files (ifo, vob, bup).
TMPGEnc XPress - Source Wizard - 2
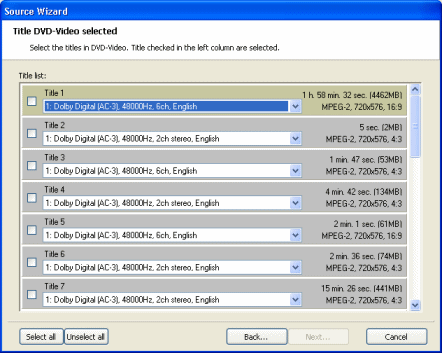
It is important to say first of all that you may not be able to decode the AC3 audio without a plug-in. As you can see in the pic that accompanies this text, the next thing you have to do is select which titles you want to encode. Usually the longest title is the Movie. You can then select which audio track of multiple audio tracks that you wish to keep. When you have selected the audio you wish to keep, click the Next button.
TMPGEnc XPress - Source Wizard - 3
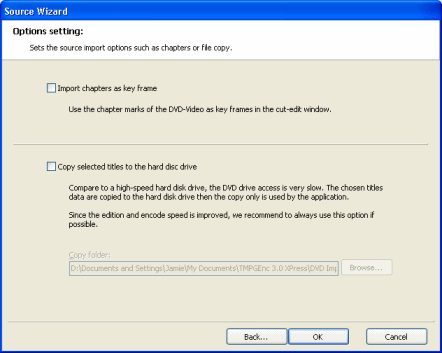
This screen gives you two options that can be quite useful. First of all if you select Import Chapters as Key Frame, this means that in the Cut-Edit window, you will see the chapters as key frames in the key frame list. The second option is Copy selected titles to the hard disc drive. This option is there if you have accessed your DVD files on a DVD Disc drive. Access to a DVD Drive is very slow, and will result in slower performance, so if you select this, it will copy the DVD files to the HDD first for quicker access. When you are done, Click OK. If you selected the Import chapters as key frame option, then you will see the program search for the chapters first, then it will load the Add file window. Now we have to cover the Filters that you can use during encoding. To access the filter list, simply click the Filters button on the Set Source window.
